Vouchers
Vouchers (or Gift Card, Gift Token, Gift Voucher) are codes that can be used at checkout to pay for all or part of an order.
They are similar to Account Credit, except that the customer does not need to have an account to use a voucher. Anyone with the voucher code can use it.
Please note: Vouchers (along with Account Credit) cannot be used to pay for subscriptions. This is because we need to capture payment details in order to process future subscription payments.
How to Use the Voucher System
There are two aspects to Vouchers:
- Creating a Voucher
- Using a Voucher
Creating Vouchers
Before a Voucher can be used, it has to be created in Salesforce. This can be done manually by creating a Voucher record, or it can happen automatically when a customer purchases a Voucher from the Store.
Creating Vouchers Manually
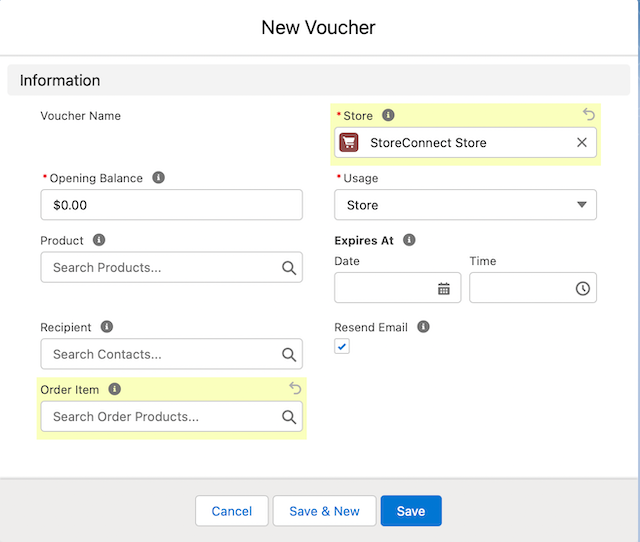
To create a new voucher, open a new Voucher window and supply:
Required fields:
- Store
- Opening balance (initial value) of the voucher (eg $50 for a $50 voucher)
- Product that the Voucher relates to, eg the $200 Christmas Bonanza Gift Voucher
- Recipient (Contact) who will receive the voucher via email
Optional Fields
- Expires At - enter an expiry date or leave it blank for no expiry
- Usage - Store, Store Group, or Any Store. (See “Voucher Usage“ below for more information)
- Order Item - a lookup to the OrderItem that this voucher was purchased with. For manual vouchers you will probably never set this.
- Resend Email - if this is checked when the record is saved, it will attempt to send the voucher by email to the Recipient. See “Sending Vouchers” below for more information.

Once you have created a Voucher it can be used by entering the Code at checkout. The Code will be generated when the Voucher is created, and the Code will be emailed to the recipient.
Now that you know how to create Vouchers manually, it’s time to look at the other way a voucher can be created: automatically after purchase.
Creating Vouchers from Orders
The most common way Vouchers will be created is in response to an Order from the Store. Here is how that works.
Voucher Products
Firstly you need to define a Product that when purchased will trigger the creation of a Voucher. We’ll call these Voucher Products.
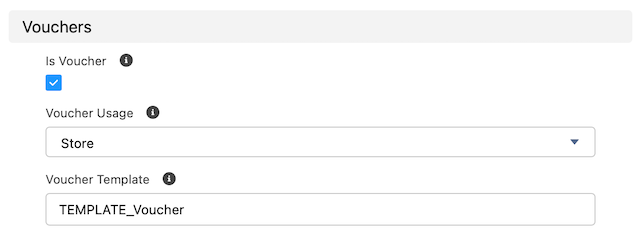
To make a Voucher Product, go to the Voucher section on the Product layout and check the Is Voucher checkbox. Then specify a Voucher Usage (See “Voucher Usage“ below for more information) and a Voucher Email Template. These last two settings will be carried over to any Voucher that is created based on this Product.

Configure this product as you would any other Product so that it appears on the Store with a price. If you will only be emailing vouchers, you can also set the Product’s Virtual field to true so that it does not need to be configured for Shipping.
A Voucher Product is Purchased!
When a Voucher Product is purchased, you can process your Order as you normally would. When the Order status is changed to “Activated” the Voucher will be created and emailed to the Recipient (See “Sending Vouchers” below for more information.) The email template used for this email will be determined by which template was set on the Voucher Product.
TIP: Having an Order Status of “Activated” is not necessary. You can choose the Order Status that triggers the Voucher creation by entering a Status API name in your Store’s “Deliver Vouchers At Order Status” field. Regardless of the chosen Status, it’s important to make sure the Order is fully paid before changing it to that status.
A Voucher has been emailed
Your customer should now have received an email with the details of their Voucher. Our default template tells them the voucher Code, the amount, and the expiry date (if any).
If the customer has purchased this voucher for someone else, they can forward the email, or print it and give it to the intended recipient. Or you may choose to generate a nice PDF of the voucher and attach that to the email.
Either way, the intended recipient knows the voucher code and can use it on the Store.
Using Vouchers
Checking a Voucher’s balance
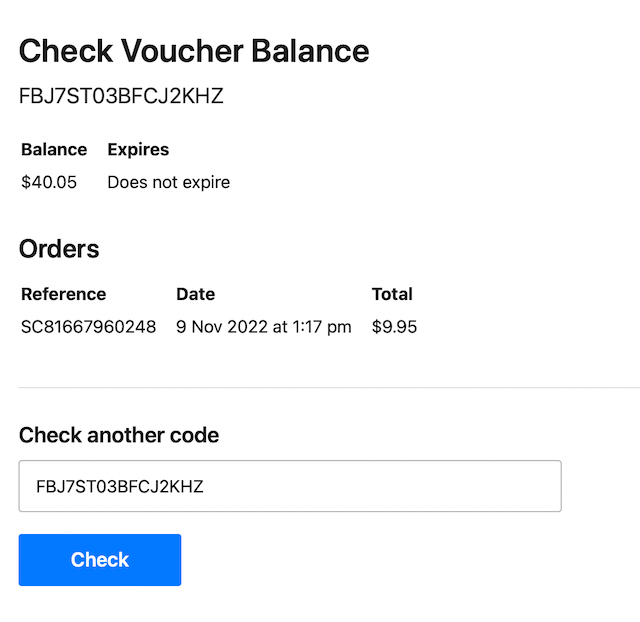
Customers can go to a page on the Store (https://your-store-domain.com/check-voucher) to check their voucher’s balance. They can enter the code in the form and submit to see the current balance and any Orders that have been placed with it. Since this can be done without logging in, the data shown is limited and anonymous.

Paying with a Voucher
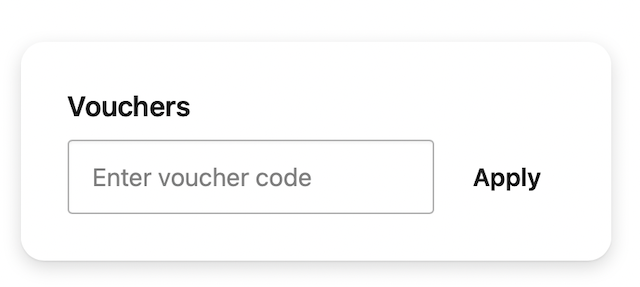
Using a voucher on the Store is simple. Just enter the Code in the Voucher Panel during checkout.

The voucher will be validated for current balance and expiry, and if all is good, the Voucher will be applied to the cart. The voucher can be used to pay for all or part of an order, but the Customer can’t apply only part of the voucher. Any vouchers applied (yes, you can apply multiple) will be used up if the total order amount is more than the total voucher amount. If the voucher does not cover the total amount, the customer will need to select a payment option to pay the balance.
Voucher Payments
A Payment record will be created for each voucher used, and a Voucher_Payment__c record will also be created, allowing us to track the spend against each voucher in order to calculate its remaining balance.
More Information
Sending Vouchers
Whenever a Voucher is saved with the Resend_Email__c field checked, it will email the voucher to the Recipient. This happens by default when the Voucher is created, but you can trigger it anytime later.
To send the email successfully, the following conditions need to be satisfied:
- A Recipient is set and has an email address
- A Product is set and has a valid email template assigned in
Product2.Voucher_Email_Template__c - The voucher Code is not blank (
Code__c) (See “Voucher Codes” below for more information)
We have configured the email template against the Voucher Product so you can have a distinctive email template for each Voucher if required.
Voucher Usage
We are aware that some Vouchers will be intended to be used across different related Stores. The Product2.Voucher_Usage __c and Voucher__c.Usage__c fields are how you can configure what Stores a voucher can be used on. Here are the options:
- Store: the voucher can only be used on the Store it was purchased on (the Purchasing Store)
- Store Group: the voucher can be used on the Purchasing Store and any Store belonging to it’s Store Group (if any)
- Any Store: the voucher can be used on any Store in your org. One caveat to the above, is that a voucher can only be used on a Store that uses the same currency as the Purchasing Store.
When a voucher is created from a Voucher Product purchase, the vouchers Usage will be copied over from the product’s Usage field.
Voucher Codes
Voucher codes are automatically generated when a Voucher is created. StoreConnect generates a 16-character long alphanumeric code that is case-insensitive. That means there are 7,958,661,109,946,400,884,391,936 possible codes.
It is important that there be a large number of possible codes (large code space) so that they cannot be easily guessed. Remember, anyone who knows (or can guess) a code can use it! But only if it has already been generated - which is why we only generate on demand, not in advance.
Since vouchers can potentially be used on multiple (or any) Stores, they have to be unique across all Stores (as opposed to unique per Store) and this means we need a larger code space than we would with a unique-per-store set up.
So we think 16 characters is the minimum voucher length you would want to have. However if you want to specify a different voucher length, or a different composition, we have provided a way for you to override the voucher code.
Supplying your own Voucher Codes
To configure the Voucher system to use your own code format, you can:
Implement the global interface IVoucherCodeGenerator, and
Enter your public class’ name as the value of the Voucher_Code_Generator_Class setting, in the StoreConnect Settings Custom Metadata Type.
The interface has 1 method: String generate(Voucher__c voucher).
The only requirement you need to satisfy is that the string is:
- Unique, and 80 characters or less
Default Voucher Expiry
When created automatically from an Order, Vouchers are created with a blank expiry date, meaning they do not expire.
If you want Vouchers to have a default expiry date, you can use the following fields on your Store record:
Voucher Expiry Unit(Month or Week)Voucher Expiry Length, e.g.12for 12 Months
If these are both set, the Voucher will have an expiry date based on the time the Voucher was created. If you want to further customise the expiry date, you can modify it in your own AfterUpdate trigger.
Back to Documentation