Product Variants
StoreConnect uses a master product and variant products model, where a master product will be the one that shows up in search, and the variant products are the ones that are added to a cart.
First a couple of definitions:
-
Master Product is a product that shows up in search results and can have one or more Variant Products as options to purchase when buying the product.
-
Variant Product is a product that’s listed as one of the options to buy when viewing a Master Product.
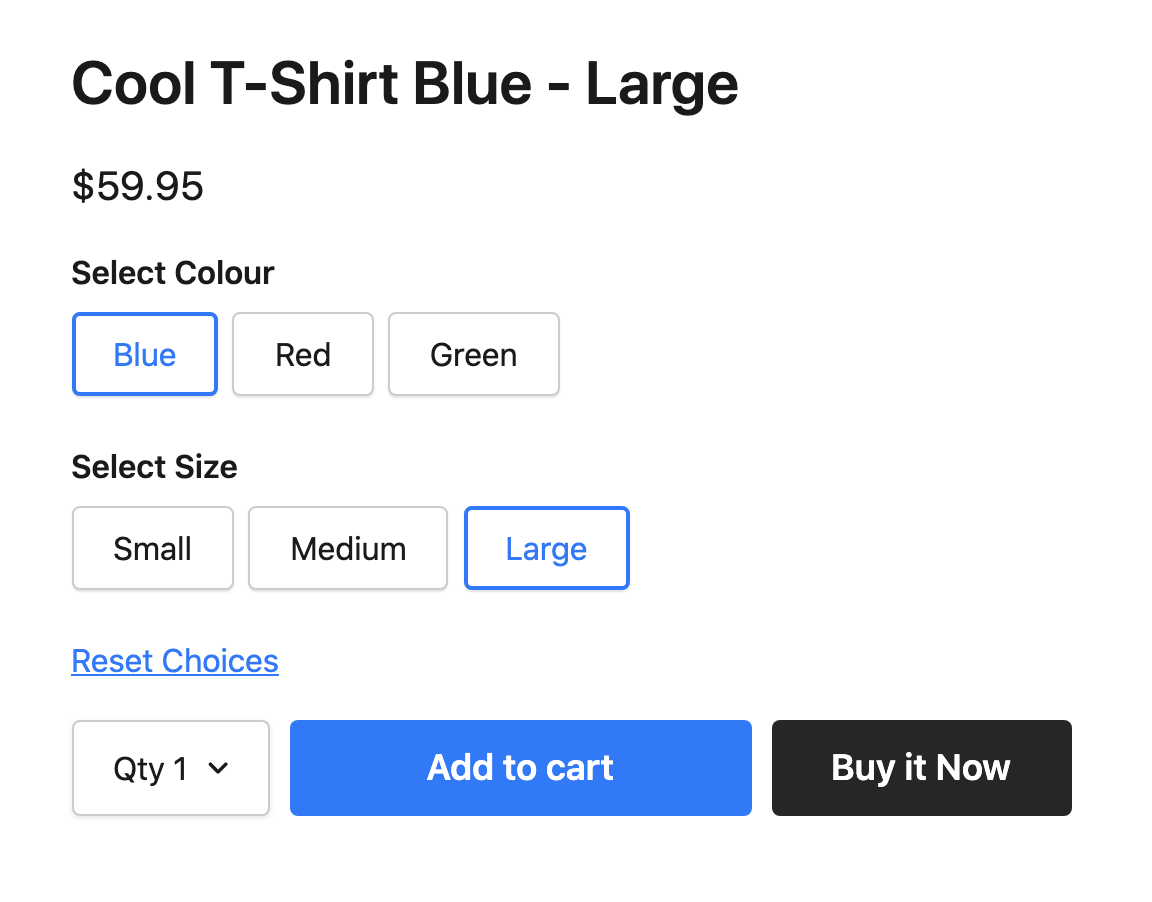
So, if you have 2 types of variant (perhaps size and colour) and 3 options in each type (small, medium, large and red, green, blue) then this would require a total of 10 products to allow you to select any one of them.
- Master Product - Cool T-Shirt
- Variant Product - Cool T-Shirt Small Red
- Variant Product - Cool T-Shirt Small Blue
- Variant Product - Cool T-Shirt Small Green
- Variant Product - Cool T-Shirt Medium Red
- Variant Product - Cool T-Shirt Medium Blue
- Variant Product - Cool T-Shirt Medium Green
- Variant Product - Cool T-Shirt Large Red
- Variant Product - Cool T-Shirt Large Blue
- Variant Product - Cool T-Shirt Large Green
Of course, if you do not have a Large Green product available (either no variant product or the variant product is unavailable because it is out of stock), then that option will not be available to select.
To add a variant, navigate to the master product and click on the related tab. You should see both “Variant Products” and “Master Products” on the related page.
The Variant Products list is the list of products that belong to the current Master Product we are viewing.
The Master Products list shows all the master products variant types that this Variant Product belongs to.
If we are looking at our “Cool T-Shirt” master product above, and we have already created the 9 variant products for each size/colour combination, the process of adding them would be:
- Go to the Cool T-Shirt master product
- Click on the related tab
- Click new next to “Variant Products”
- The “Cool T-Shirt” will already be listed as the Master Product
- Search for Cool T-Shirt Small Red in the Variant Product field and select it
- Select “Size” from Variant Type
- Type “Small” in the Variant Value
- Select a position (increments of 10 are a good choice to allow easy insertion of new sizes later)
- Click “Save and New”
- You will have the form again with “Cool T-Shirt” already listed as the Master Product
- Search for Cool T-Shirt Small Red in the Variant Product field and select it
- Select “Color” from Variant Type
- Type “Red” in the Variant Value
- Select a position (increments of 10 are a good choice to allow easy insertion of new sizes later)
- Click “Save”
This will successfully add the variant for both size Small and colour Red to the Cool T-Shirt Master Product.
Repeat the above steps for the other 8 products, or create this in a spreadsheet and use a tool like dataloader.io to do a bulk upload.
Display and Positioning
If you have a Variant Type with five or fewer values, each value will display as a button on the product page. If you have more than five values, they will show in a drop-down menu.
Variant Types and Variant Values are positioned on your product page by the values in the position field. Lower numbers appear first. When configuring the Variant Types for Colour, “Cool T-Shirt Red (S)” set at position 10 would appear before “Cool T-Shirt Blue (S)” set at position 20.
To make the sizes display below the colour options, you would use larger numbers for the size positions than were used for the colours. eg. Small position = 100, Medium position = 110 etc.

Master and Variant Product Pricing
When configuring prices for your variant products, make sure:
- The Master Product has a Price Book Entry.
- Each Product Variant has a Price Book Entry as well.
Product Variants that belong to the same Master Product can have different prices configured for them.
You can configure the Master Product to display the least amount your customers can expect to pay for the related Product Variants. To do this, navigate to the Master Product Price Book entry and select “Hide Price”. Fill in the “Hide Price Text” with something like “Starting from $9.99”
Bulk Uploading Variants
Variant Product relationships are stored in the Product_Variant__c object.
Field Mapping:
- Product Variant Master - Master Product record ID
- Variant - Variant Product record ID
- Position - Integer to determine the sort order when a product has multiple variants of the same type
- Variant Value - The value that distinguishes this variant from others of the same type
- Variant Type - Picklist
- StoreConnect comes with a few existing types like colour and size
- Your Salesforce Admin can add any Variant Types you may need
Back to Documentation