Payment Providers
StoreConnect supports several payment methods and payment service providers. For your StoreConnect store to be able to accept payments using a service provider, you will need to create accounts with your chosen providers and get from them credentials for both testing and for your live site. With these credentials, you then create a Payment Provider record for each.
Supported Payment Options:
- Authorize.Net
- Bambora
- Braintree
- eWAY
- PayPal
- SecurePay
- Square
- Stripe
- Stripe ACH
- Windcave
- Zip
- Pay on Account
- Pay Later
Configuring Payment Providers
Each store must have at least one payment provider record to be able to accept payments, and these can be created from the store’s Payment Providers related list. When building your site and testing, you should be using the testing credentials and then switch over to the live credentials when your site goes live. Pay on Account and Pay Later do not require test credentials.
If you already have an account with one of our supported providers, use the test credentials they have supplied you. Otherwise go to Stripe’s website and create an account. When you first sign up for Stripe, you may get asked to activate payments. Activating payments will take you through the steps needed to give you a live payment gateway that receives real payments. You can skip this for now if you want and go straight to your dashboard where you will be able to access your test credentials.
Payment providers generally offer test card numbers to test with. A common card we use for testing is 4242 4242 4242 4242 Exp:a date in the future CVC any 3 digits
Recurring Payments
If you need to set up a Store that sells subscriptions and processes recurring payments using a credit card, there are currently three providers that are supported:
To configure a payment provider:
- From the Store record, find the Payment Providers related list and click ‘New’
- Choose the Provider name from the picklist
- Set a display name for how you want this option to display at checkout
- Set a Description if you want to give a description of the payment option or display a message when user selects this payment provider on the website
- Set Payment Instructions if you want to give some payment instructions or show a message to the user on the order completion page if they have any payment remaining to be paid. (Mainly used for Pay Later and order’s that have part/deposit payments)
- Set a position to dictate what order it displays in when more than one Payment Provider is offered at checkout
- Enter the API credentials
- The API Mode identifies if you are configuring for testing or for a live site
- The API Key is the key or ID given to you by the provider
- The API Secret is the secret or password given to you by the provider
- The API Options are only required by some providers and if needed are in the instructions below
- Click ‘Save’
Refer to the instructions below for more specific directions on the provider you are configuring.
Payment Surcharges
If you choose to pass your payment provider’s fees to your customers, do so using the Surcharge Product lookup. You can charge a flat amount like $0.30 per transaction or a percentage of the payment amount, or both.
The surcharge will show up on the order as an Order Product, adding to the order’s total amount.
WARNING: Check the regulations for the areas you sell to regarding passing on this fee to customer. It can differ for each geographical zone. For some countries, you are allowed to pass on the full fee to the customer.
WARNING: The fee you will pay your provider will be based on the total of the order plus the fee you charge (the total amount paid by the customer including their surcharge). To cover this, the percentage charged to your customer is always slightly higher than the percentage charged to you. You should avoid specifying an exact percentage for the surcharge as it can differ depending on the order amount and especially if a flat fee is payable on top of a percentage.
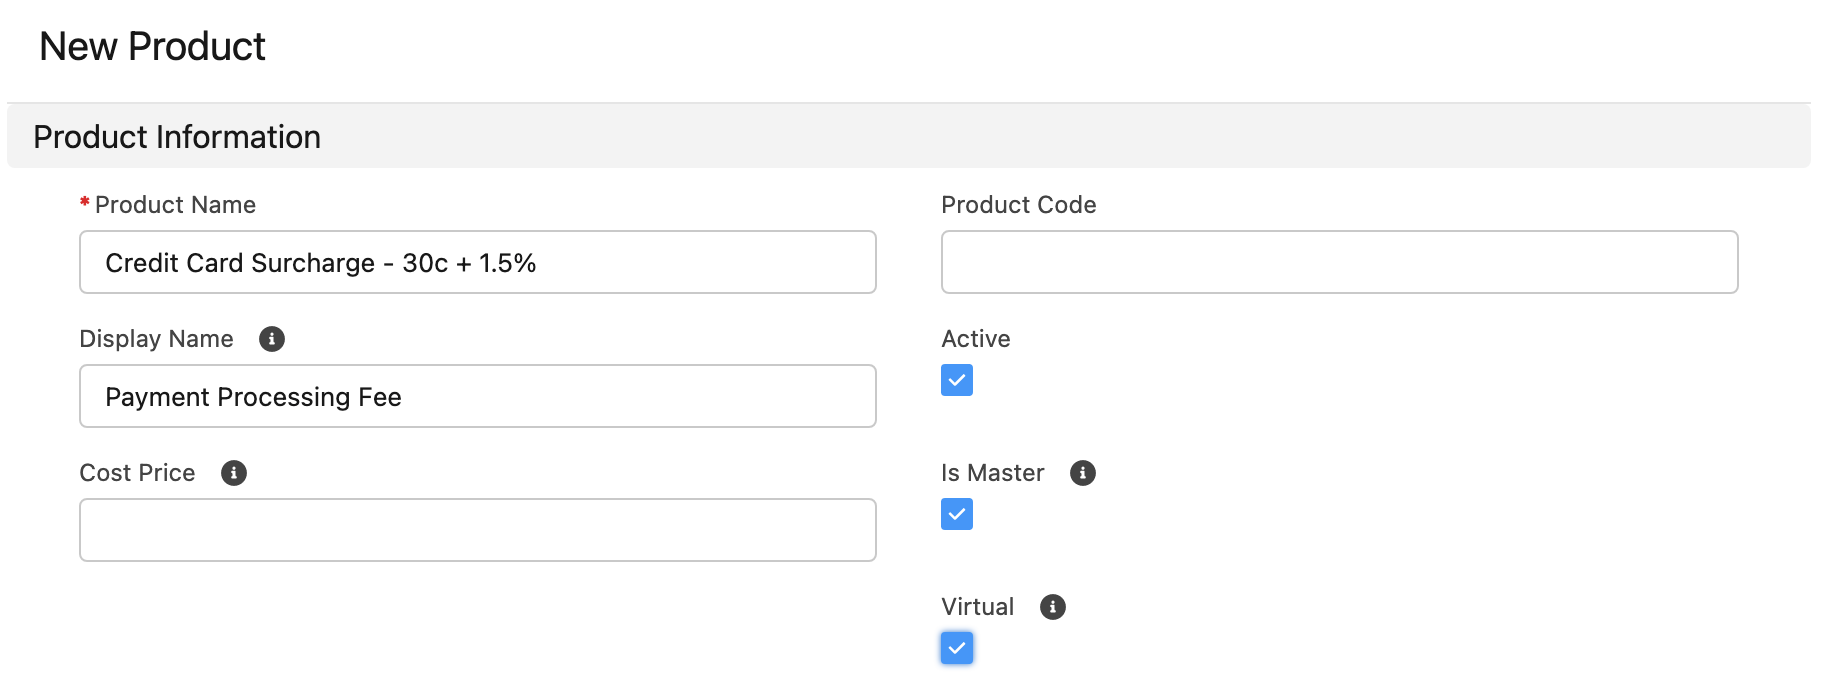
Create a Surcharge Product:
- Create a product and give it a display name that the customer will see, like ‘Payment Processing Fee’
- Make sure your product is active
- Set it as a Virtual Product

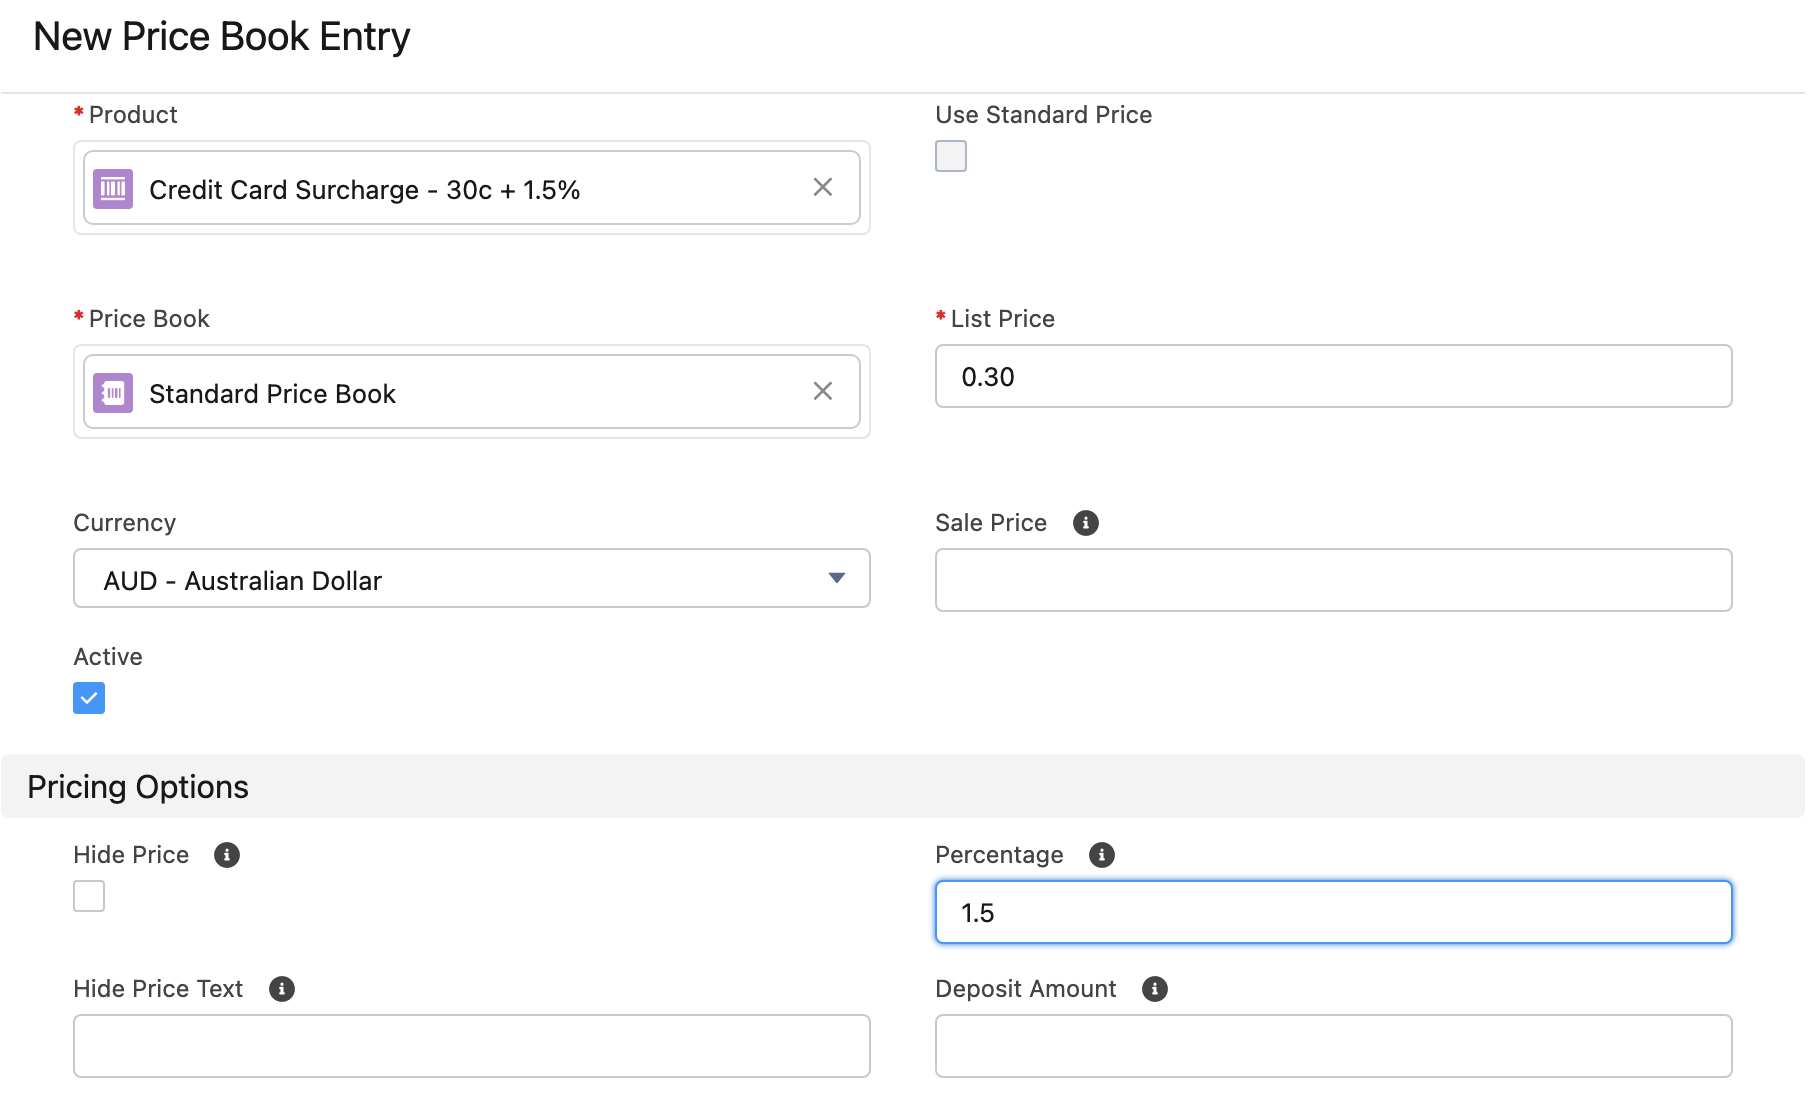
Set the Fee amount in the Price Book Entry:
- Create a Price Book Entry for each price book and currency you need it for
- For the flat fee, set the list price, this can be $0 if there is no flat fee or something like $0.30, etc. based on what your provider charges you
- Set the percentage your provider charges you, like 1.5%
- Do the same for each price book that you intend to charge the surcharge for, including Account or Membership specific price books and any other currencies

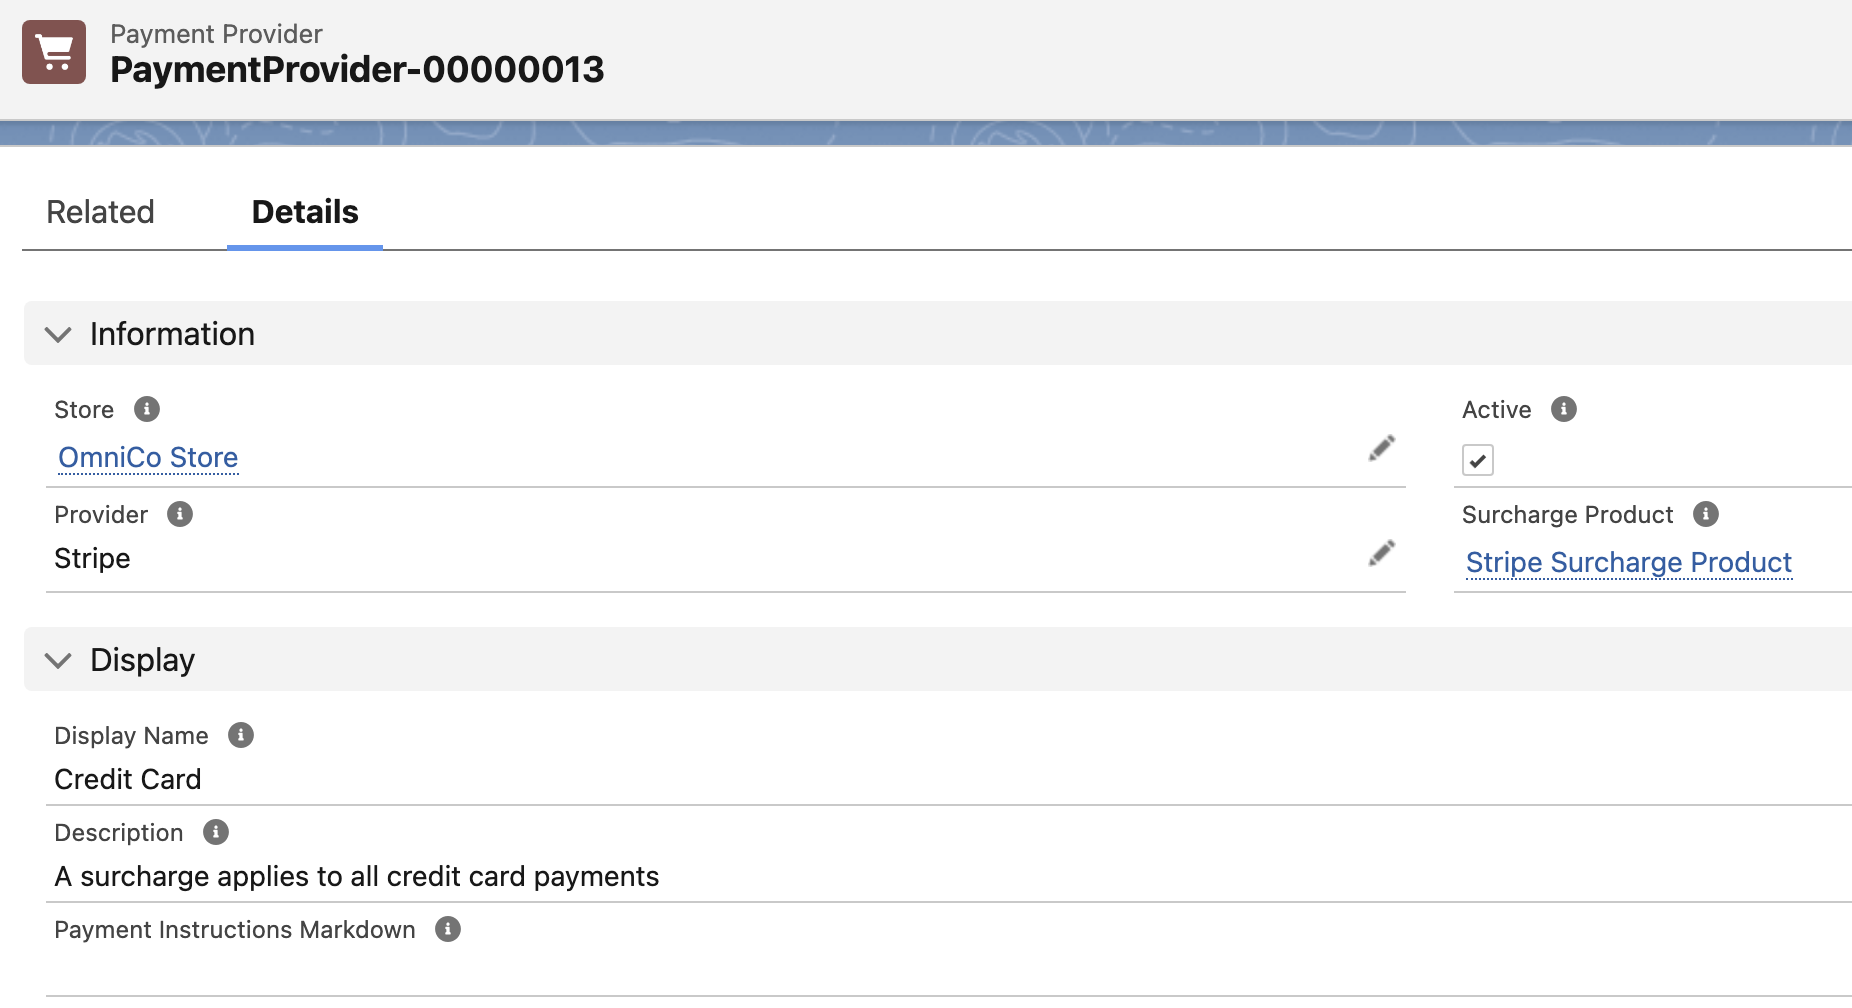
Set the Surcharge Product for each Payment provider it applies to:
- On your Payment Provider record, set the Surcharge Product you just created
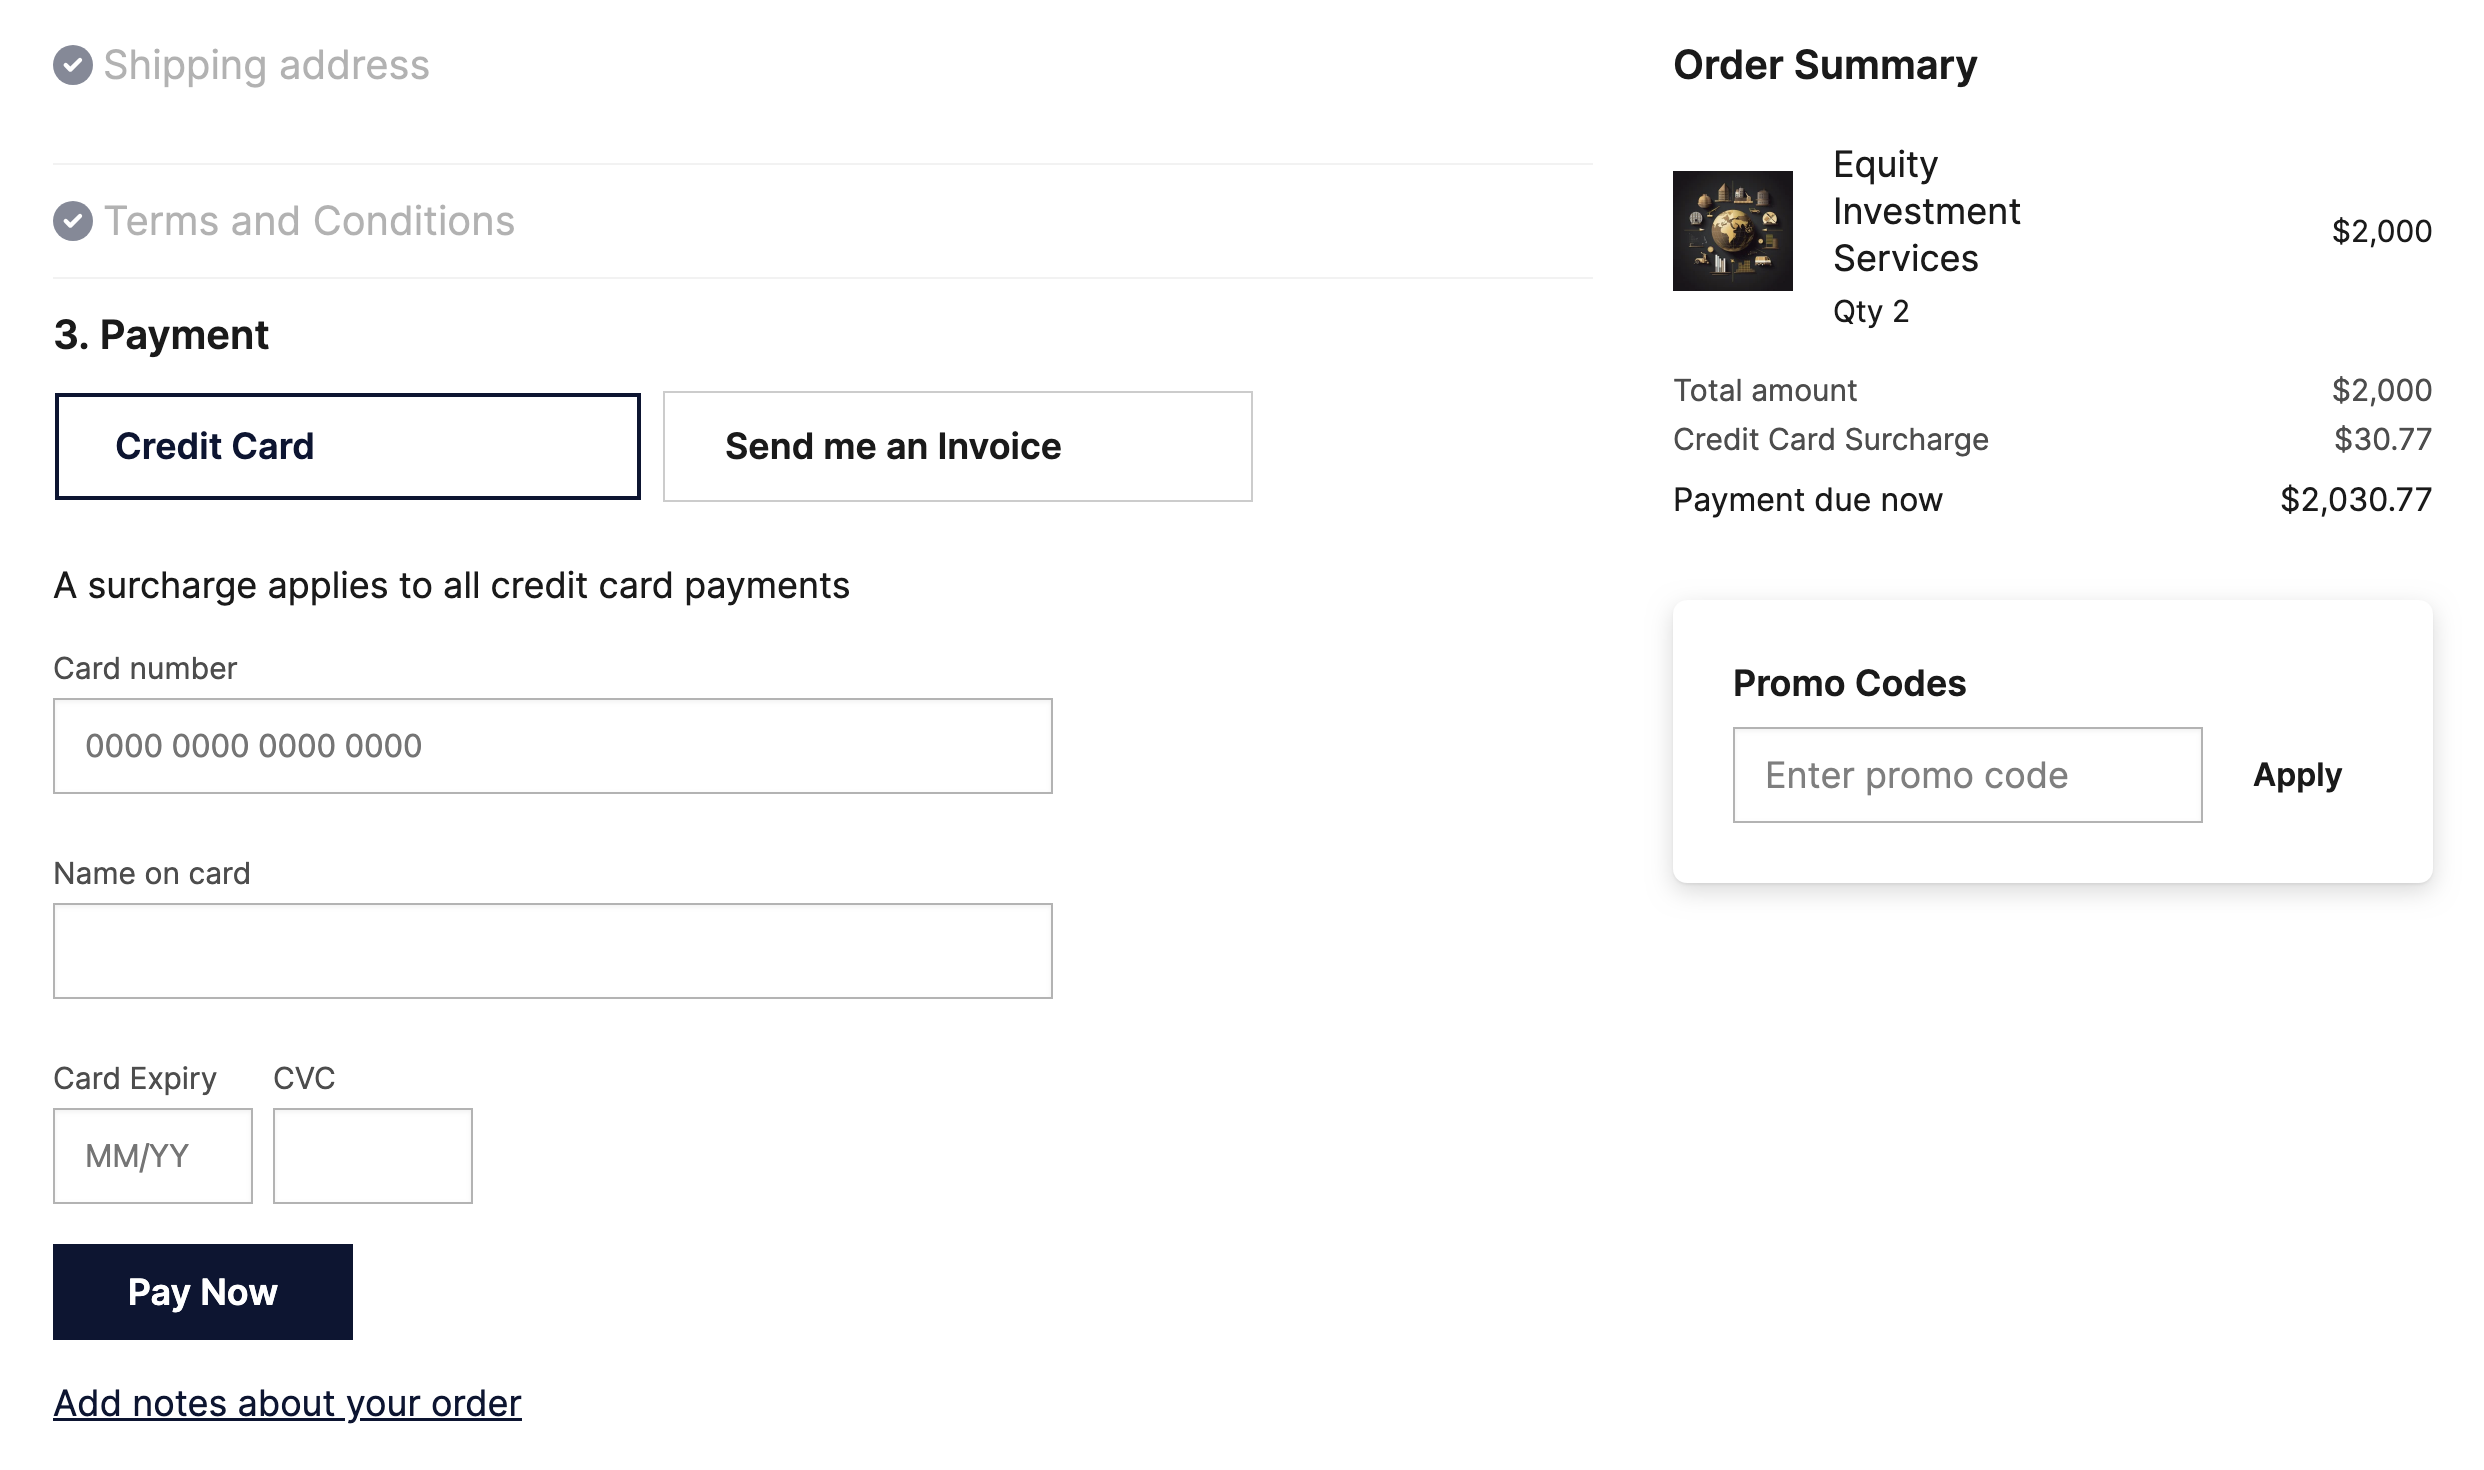
- Add a description if you want to let your customers know there is a surcharge
- Do the same for all payment provider for each store that this applies to

And this will then show up during checkout when they select that payment provider and show in the order summary.

Authorize.Net
You will need to sign up with Authorize.Net if you don’t already have an account.
To generate the Client Key, log in to the Merchant Interface as an Administrator and navigate to Account > Settings > Security Settings > General Security Settings > Manage Public Client Key.
If the Public Client Key does not yet exist, answer your security question to generate the key. Once your account is set up, go into your store in Salesforce and create a new Payment Provider related object. Enter the values as follows:
| StoreConnect Field | Authorize.Net Value |
|---|---|
| API Key | API Login ID |
| API Secret | API Transaction ID |
| API Options | Public Key |
| API Mode | sandbox or production |
Your API Mode should be sandbox and then later be changed to production when you are going live.
To specify the Public Key, add the following to the API Options field of the Payment Provider record:
public_key: "YOUR_PUBLIC_KEY"
It is important to put this in quotes as above, so for example, if your Public Key is 86ujz98tK9B767EY7FeWdo293dk4UZZSt65jbmrx5L9fQgm7DqLKFeWdo293dk then you would enter the following exactly into the API Options field:
public_key: "86ujz98tK9B767EY7FeWdo293dk4UZZSt65jbmrx5L9fQgm7DqLKFeWdo293dk"
Bambora
| StoreConnect Field | Bambora Value |
|---|---|
| API Key | Bambora Merchant ID |
| API Secret | Bambora API Key |
| API Mode | NA or https://api.na.bambora.com |
To generate your credentials, follow these instructions from Bambora: Create Account
Currently, we are only supporting the Bambora North America Gateway.
Braintree
| StoreConnect Field | Braintree Value |
|---|---|
| API Key | API Public Key |
| API Secret | API Secret Key |
| API Options | Merchant ID |
| API Mode | sandbox or production |
To generate your credentials, follow these instructions from Braintree: API keys
To specify the Merchant ID, add the following to the API Options field of the Payment Provider record:
merchant_id: "YOUR_MERCHANT_ID"
It is important to put this in quotes as above, so for example, if your Merchant ID is aqrdb3f78k8dpkbd then you would enter the following exactly into the API Options field:
merchant_id: "aqrdb3f78k8dpkbd"
eWAY
| StoreConnect Field | eWAY Value |
|---|---|
| API Key | API Key |
| API Secret | Password |
| API Options | Encryption Key |
| API Mode | sandbox or production |
To generate your credentials, follow these instructions from eWAY:
- Sandbox: Creating an eWAY Sandbox API key
- Production: How do I set up my Live eWAY API Key and Password?
To specify the Public Key, add the following to the API Options field of the Payment Provider record:
public_key: "YOUR_ENCRYPTION_KEY"
It is important to put this in quotes as above, so for example, if your Encryption Key is 86ujz98tK9B767EY7FeWdo293dk4UZZSt65jbmrx5L9fQgm7DqLKFeWdo293dk then you would enter the following exactly into the API Options field:
public_key: "86ujz98tK9B767EY7FeWdo293dk4UZZSt65jbmrx5L9fQgm7DqLKFeWdo293dk"
This key can be obtained from your eWAY account under My Account > Client Side Encryption > Encryption Key.
PayPal
| StoreConnect Field | PayPal Value |
|---|---|
| API Key | Client ID |
| API Secret | Secret |
| API Mode | sandbox or production |
StoreConnect uses PayPal’s Smart Payment Buttons.
To generate your credentials, follow these instructions from PayPal: Set Up Your Development Environment.
SecurePay
| StoreConnect Field | SecurePay Value |
|---|---|
| API Key | Client ID |
| API Secret | Client Secret |
| API Options | Merchant Code |
| API Mode | sandbox or production |
To generate your credentials, follow these instructions from SecurePay:
- Sandbox: To get started with SecurePay
- Production: Login to your account to test your integration and complete the application form
To specify the Merchant Code, add the following to the API Options field of the Payment Provider record:
merchant_code: "YOUR_MERCHANT_CODE"
It is important to put this in quotes as above, so for example, if your Merchant Code is 86ujz9 then you would enter the following exactly into the API Options field:
merchant_code: "86ujz9"
Stripe
| StoreConnect Field | Stripe Value |
|---|---|
| API Key | Publishable Key |
| API Secret | Secret Key |
| API Mode | sandbox or production |
To generate your credentials, follow these instructions from Stripe: Manage your API keys to authenticate requests with Stripe
Stripe ACH
Enable ACH direct debit as a payment method in your stripe dashboard.
| StoreConnect Field | Stripe Value |
|---|---|
| API Key | Publishable Key |
| API Secret | Secret Key |
| API Options | Statement Name |
| API Mode | sandbox or production |
To generate your credentials, follow these instructions from Stripe: Manage your API keys to authenticate requests with Stripe
By default the Bank Statement will show the Store name. To specify a different name, add the following to the API Options field of the Payment Provider record:
statement_name: "ACME Inc"
Limitations:
- Only USD currency is supported
- Only microdeposits verification is supported
- It takes 1-4 business days before the money is credited to your Stripe account. The Stripe payment ID (ie.
pi_xyz1234) is stored on the Payment record to help with manual reconciliation once the money is credited.
To learn more about ACH direct debit, visit the Stripe ACH docs.
Square
| StoreConnect Field | Square Value |
|---|---|
| API Key | Application ID |
| API Secret | Access Token |
| API Mode | sandbox or production |
| API Options | Location ID |
To generate your credentials, follow these instructions from Square: Square API Access Tokens
To specify the location ID, add the following to the API Options field of the Payment Provider record:
location_id: "YOUR_LOCATION_ID"
It is important to put this in quotes as above, so for example, if your location ID is L233H82QGSEQV then you would enter the following exactly into the API Options field:
location_id: "L233H82QGSEQV"
Windcave
| StoreConnect Field | Windcave Value |
|---|---|
| API Key | API Username |
| API Secret | API Key |
| API Mode | sandbox or production |
To generate your credentials, follow these instructions from Windcave: REST Guide
Zip
| StoreConnect Field | Zip Value |
|---|---|
| API Secret | Private Key |
| API Mode | sandbox or production |
To generate your credentials, follow these instructions from Zip:
- Sandbox: Zip Sandbox Merchant Dashboard
- Production: Zip Live Merchant Dashboard
Pay on Account
| StoreConnect Field | Usage | Input |
|---|---|---|
| Display Name | e.g: Purchase Order | Plain Text |
| Description | e.g: Terms are Strictly 30 days | Plain Text, Markdown, HTML |
| Payment Information Markdown | e.g: Statements are sent at the end of each month and due by the end of the following month | Plain Text, Markdown, HTML |
| API Secret | “x” | Plain Text |
| API Mode | “x” | Plain Text |
* Pay on Account does not use an API Secret or API Mode, but since these two are required fields, you need to give them a value. For simplicity you could just mark them with an x.
Pay Later
| StoreConnect Field | Usage | Input |
|---|---|---|
| Display Name | e.g: BPAY, Bank Transfer, Cheque | Plain Text |
| Description | e.g: May take 3 business days to process | Plain Text, Markdown, HTML |
| Payment Information Markdown | e.g: bank account details / payment terms | Plain Text, Markdown, HTML |
| API Secret | “x” | Plain Text |
| API Mode | “x” | Plain Text |
You can add as many Pay Later payment methods to a store as you need.
* Pay Later does not use an API Secret or API Mode, but since these two are required fields, you need to give them a value. For simplicity you could just mark them with an x.
Back to Documentation